


Avoid Costly Rework: ADA Bathroom Requirements Owners Must Fix Early
- DJ Custom Contracting

- 2 days ago
- 15 min read
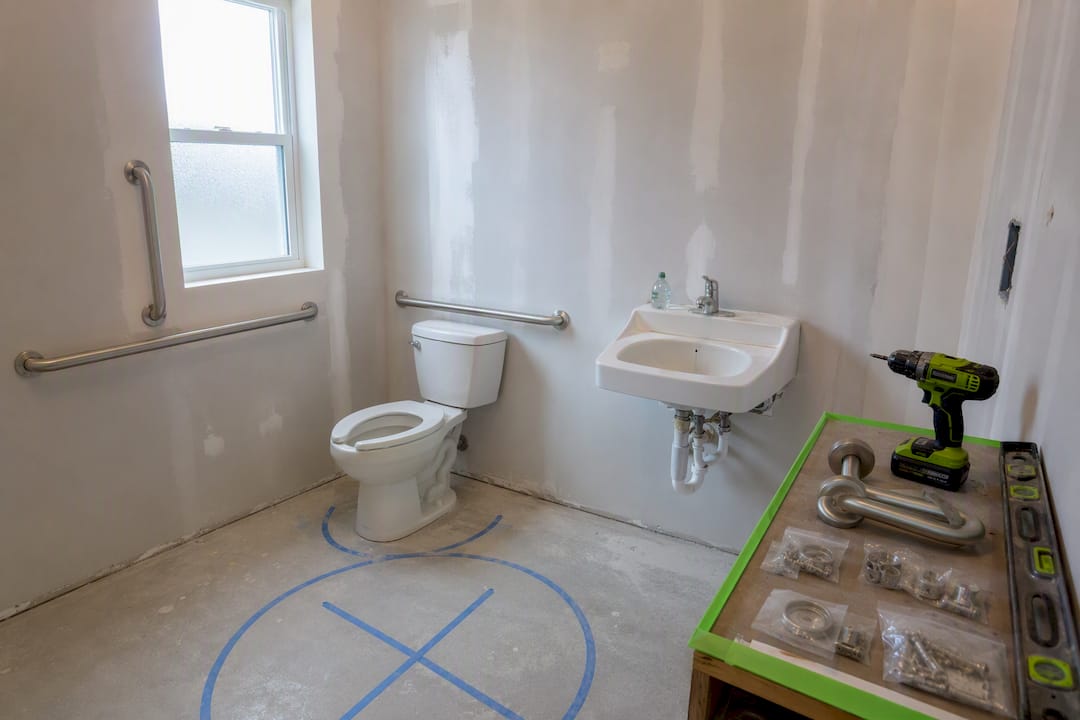
ADA bathroom requirements are the federal technical standards that govern accessible measurements, clearances, and fixtures in restrooms, not the total number of toilets a building needs. Those measurements include a 60-inch turning space, a toilet centerline set 16 to 18 inches from the sidewall, seat heights of 17 to 19 inches, and grab bars mounted 33 to 36 inches above the floor. Fixture counts fall to local plumbing and building codes. Use the measurement checklist below, then bring a qualified contractor into plan review before you pour a slab or open a wall.
TL;DR:
Most ADA bathroom failures are caused by poor blocking decisions and discrepancies between plan measurements and on-site execution.
Ensuring grab bars resist a 250-pound load and are properly anchored during framing prevents costly rework and inspection failures.
Compliance with local codes and overlays like ICC A117.1 often exceed federal standards, making early review with authorities crucial.
Accurate pre-inspection checks on fixture placement, clearances, and signage placement are essential before final approval.
Ongoing maintenance, including periodic inspections and documentation, is necessary to maintain ADA compliance post-construction.
Table of Contents
What Ada Bathroom Requirements Actually Cover
ADA bathroom requirements determine which restrooms must be accessible and how those accessible rooms must be built. They don’t tell a restaurant owner how many toilets to install. That number comes from the local plumbing code based on occupancy load. The ADA Standards step in once a fixture exists and dictate whether people using wheelchairs, walkers, or other mobility devices can actually use it.
Section 213 of the 2010 ADA Standards sets the baseline: in new construction, every toilet and bathing room generally must be accessible. Alterations carry a slightly different standard. When you renovate an existing restroom, you must bring the altered elements up to code to the maximum extent feasible, even if a full accessible overhaul isn’t practical within that scope of work.
Employee-only restrooms aren’t exempt. A back-office bathroom used exclusively by staff still falls under scoping requirements, though the specific accessible route and shared-space rules can differ slightly from public-facing facilities. Property managers frequently miss this distinction and assume “public” is the only trigger.
Two scoping exceptions matter for real-world layouts:
Clustered single-user rooms: When single-user toilet rooms are grouped together in a cluster, at least half of each fixture type (water closets, urinals, lavatories) across that cluster must comply rather than requiring every single room to be fully accessible.
Portable units: Where portable toilets are provided at a temporary jobsite or event, at least 5% of the units in each cluster must meet accessibility requirements, with a minimum of one accessible unit per cluster.
Whether a facility is built as toilet compartments inside a shared multi-user room or as a single-user toilet room changes the compliance math entirely, and in alterations, a compliant unisex accessible room can sometimes substitute for bringing an entire multi-user room up to standard when technical infeasibility applies. Getting this classification wrong early is one of the most common reasons plan reviewers send drawings back.
Technical Measurements Every Ada-Compliant Bathroom Needs
This is the section contractors bookmark. Every dimension below comes from the 2010 ADA Standards for Accessible Design or the U.S. Access Board’s supporting guidance, and it’s what a plan reviewer or inspector will actually measure with a tape.
Clear floor space and turning circles
Every accessible bathroom needs a clear turning space, either a 60-inch diameter circle or a T-shaped area that meets the Standards’ configuration rules. This is the single most common layout killer in small commercial restrooms, because it has to be unobstructed floor space, not the room’s total square footage.
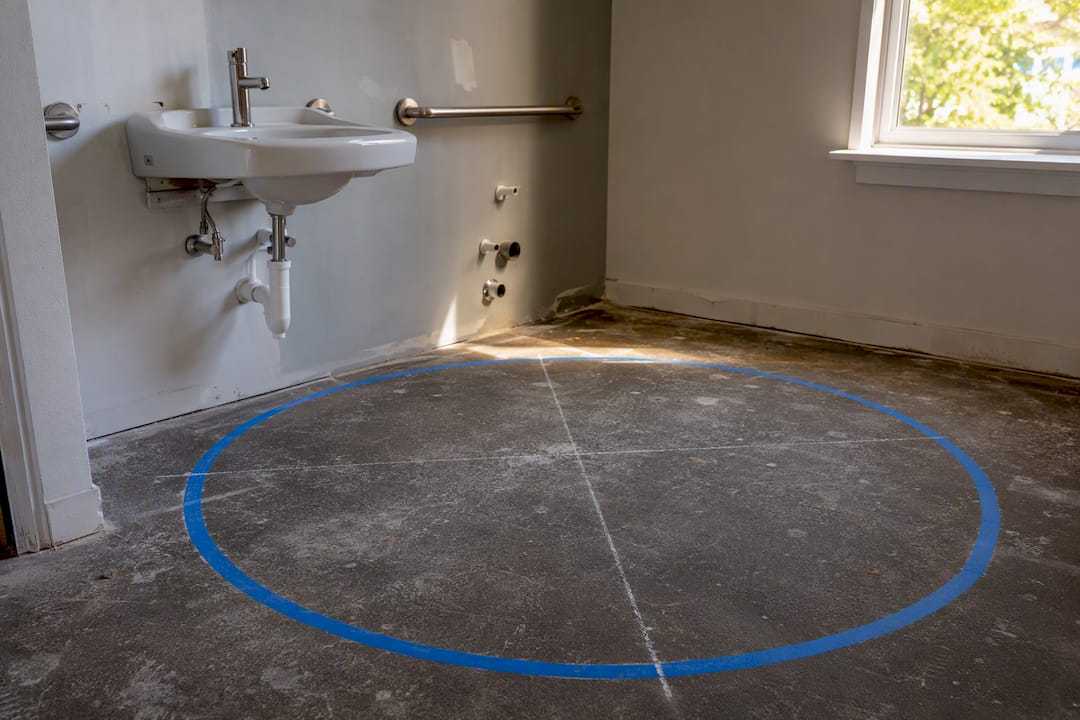
Individual fixtures also need their own clear floor space, typically 30 by 48 inches, positioned for a forward or parallel approach depending on the fixture. A lavatory’s clear space can overlap the required clearance around a water closet in tight remodels, which the Standards permit under §603 and §604 when adequate depth is provided elsewhere. That overlap allowance is often the difference between a workable ADA layout and a bathroom that simply won’t fit in an existing footprint. Our half bath size guide walks through how that plays out in compact residential and light-commercial spaces.
Toilet placement and seat height
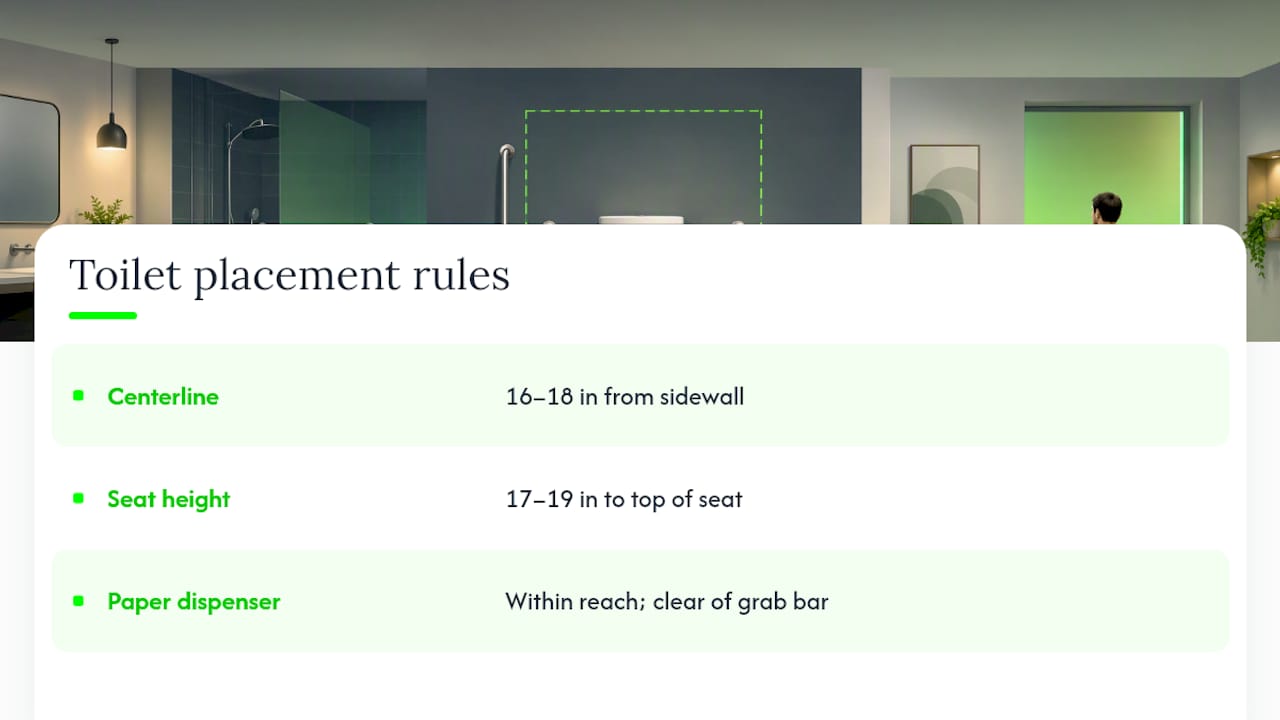
The water closet centerline must sit 16 to 18 inches from the sidewall or partition. Seat height runs 17 to 19 inches above the finished floor, measured to the top of the seat. Toilet paper dispensers have their own placement rules tied to reach range and clearance from the grab bar, and getting this wrong is a frequent punch-list item during final inspection.
Grab bars: the measurement everyone gets wrong
Grab bar layout is where most rework happens, because it’s driven by structural blocking decisions made weeks before the fixtures ever arrive.
Grab bar quick reference: Side wall bar minimum 42 inches long; rear wall bar minimum 36 inches long; both mounted 33 to 36 inches above the finished floor; minimum 1½ inches of clearance between the bar and the wall; bars and their anchorage must resist a 250-pound point load. FIG.29 illustrates the exact layout for both configurations.
That 250-pound structural requirement is the part contractors skip at their peril. A grab bar that’s perfectly positioned but anchored only into drywall will fail inspection, and worse, fail in actual use. Blocking has to go in during framing, long before anyone’s thinking about fixtures.
Pro Tip: Order your grab bars and confirm exact mounting heights before framing inspection, not after drywall goes up. Reopening a finished wall to add blocking costs far more than the five minutes it takes to check the spec sheet early.
Lavatories and knee clearance
Accessible lavatories can’t exceed 34 inches in height at the rim or counter surface. Below that, you need at least 27 inches of clear knee space at the front edge, with allowances that taper as depth increases, up to 25 inches of knee and toe clearance extending under the counter. Insulate or enclose exposed hot water and drain pipes so they don’t present a burn or abrasion hazard to someone seated at the sink.
Urinals
Where a restroom has two or more urinals, at least one must be accessible. That means a rim height no greater than 17 inches above the floor, the required clear floor space in front of the fixture, and flush controls that are either automatic or mounted within the accessible reach range and operable without tight grasping or twisting.
Showers and bathing facilities
Wherever a facility provides bathing rooms, at least one shower compartment or bathtub must comply with the Standards’ bathing room provisions. Two shower configurations exist:
Transfer showers, which are smaller and require the user to transfer from a wheelchair onto a built-in seat, with grab bars on three walls.
Roll-in showers, which are larger, allow a wheelchair to enter directly, and are required in certain facility types (transient lodging with more than 50 guest rooms is a common trigger) where transfer showers alone aren’t sufficient.
Both configurations require a fold-down or fixed seat positioned per the Standards, grab bars mounted at the correct height, and controls operable with one hand using no more than 5 pounds of force, without requiring tight pinching or wrist twisting. That 5-pound force threshold applies to nearly every operable part in an ADA bathroom, including faucets, flush valves, and dispenser levers, and it’s worth testing with an actual force gauge during final walkthrough rather than eyeballing it.
How Local Codes Interact With Federal Ada Standards
The ADA Standards are a floor, not a ceiling, and that distinction trips up a lot of experienced contractors who assume federal compliance is the whole story.
Local jurisdictions frequently adopt stricter accessibility codes on top of the ADA baseline. The International Building Code (IBC) and ICC A117.1 are the two most common overlays, and they sometimes require elements the federal Standards don’t mandate outright, like an additional 18-inch vertical grab bar at the water closet in some adopted versions. If your local building department has adopted ICC A117.1, you’re building to whichever standard is stricter on any given measurement, not just the ADA.
This is why checking with your local plan reviewer before finalizing drawings matters more than memorizing the federal Standards cover to cover. A design that fully satisfies the DOJ’s ADA Standards can still get rejected at permit review if the municipality layered on additional local requirements.
A few other scoping mechanisms worth knowing:
Equivalent facilitation (§103): The Standards allow alternative designs or technologies that provide substantially equivalent or greater accessibility than what’s specified, when a literal application of a given provision isn’t practical.
Historic building exceptions: Facilities listed on or eligible for the National Register of Historic Places may qualify for modified compliance where strict adherence would threaten the historic character of the building, though this exception has real limits and doesn’t waive accessibility entirely.
Technical infeasibility: In alterations, if site constraints (structural, space, or otherwise) make full compliance genuinely impossible, the Standards allow the closest achievable level of accessibility instead.
None of these exceptions are self-certifying. A contractor or owner claiming technical infeasibility should document the constraint and, ideally, have it reviewed by the local building authority before construction, not after a citation. The ADA functions as the federal enforcement baseline for accessibility discrimination claims, but the permit that actually gets your bathroom approved is issued locally, and local reviewers care about their own adopted code first.
How Many Accessible Stalls Does Your Bathroom Need?
Scoping rules for multi-user restrooms are more specific than most owners expect, and they change depending on room size and fixture count.
Baseline rule: Any multi-user toilet room with multiple compartments must include at least one wheelchair accessible compartment meeting the Standards’ size and grab bar requirements.
Ambulatory compartment trigger: Once the combined total of toilets and urinals in a room reaches six or more fixtures, you also need at least one ambulatory accessible compartment, a narrower stall with parallel grab bars on both sides, sized for someone who walks with crutches or a walker rather than uses a wheelchair.
Clustered single-user rooms: When a building has several single-user toilet rooms grouped together, such as a row of individual restrooms in a food hall, no more than 50% of each fixture type across that cluster needs to comply, rather than making every single room fully accessible.
Portable toilet clusters: At construction sites or outdoor events, at least 5% of portable units in a cluster must be accessible, with a minimum of one unit regardless of cluster size.
Transient lodging roll-in showers: Hotels and other transient lodging facilities with more than 50 guest rooms must provide a percentage of accessible rooms with roll-in showers rather than relying solely on transfer showers, reflecting the higher volume of guests who may need that configuration.
A few real-world examples make these rules easier to apply. A retail store with four stalls in its customer restroom needs at least one wheelchair accessible compartment; it likely doesn’t cross the six-fixture threshold that triggers an ambulatory stall requirement. A boutique hotel with 60 rooms has to work roll-in shower requirements into its accessible room count from day one of design, because retrofitting that after construction means moving drains and reworking waterproofing.
Alterations sometimes allow a single accessible unisex room to substitute for bringing an existing multi-user room into full compliance, but only where technical infeasibility genuinely applies, such as when structural walls or existing plumbing chases make full compliance impossible without a gut renovation. This substitution isn’t a default option; it’s a documented exception, and plan reviewers will ask for justification.
Do You Need Accessible Signage for Every Restroom?
Signage requirements under §216 and §703 are simpler than the layout rules, but they trip up owners because the details are easy to overlook until final inspection.
The International Symbol of Accessibility (ISA) is required at accessible toilet and bathing rooms so people can identify which facility meets accessibility standards, particularly important when a building has both accessible and non-accessible single-user rooms. Where accessible and non-accessible rooms exist side by side, directional signage should point users to the correct room.
Sign construction has its own technical requirements:
Raised characters and Grade 2 Braille are required on signs that identify permanent rooms and spaces.
Pictograms, including the ISA, need a field at least 6 inches high, with a verbal description or text equivalent placed directly below the pictogram field.
Sign finish must have non-glare backgrounds and characters that contrast with their background, either light characters on a dark field or dark characters on a light field.
Placement matters as much as content. Signs should be mounted on the latch side of the door where possible, at a consistent height that meets the reach range specified in the Standards. Mounting a compliant sign on the wrong side of the door, or centering it on the door itself instead of the adjacent wall, is one of the most common and entirely avoidable failures we see during final walkthroughs.
Pro Tip: Order signage after your door swing direction and hardware are finalized, not before. A sign fabricated for the wrong wall becomes a $150 mistake that delays your certificate of occupancy.
Contractor Checklist: Verifying Compliance Before Inspection
Most ADA bathroom failures aren’t design failures; consulting the Accessible Bathroom Design: A Complete UK Guide can offer valuable insights for planning accessible layouts. They’re installation drift, small deviations between what the plans specify and what actually got built. Here’s the order-of-operations checklist worth running before you call for inspection.
Confirm blocking locations match final grab bar layout. Framing often happens before fixture specs are locked in, and mismatched blocking is the single most expensive fix on this list.
Verify grab bar height with a laser level, not a tape measure eyeballed from the floor. Both bars need to land in the 33 to 36 inch band consistently, not just close.
Check door swing doesn’t intrude into the required clear floor space or turning circle. A door that swings into the 60-inch turning area fails regardless of how well everything else is built.
Measure toilet paper dispenser placement relative to the grab bar. Dispensers mounted behind or too close to the grab bar block the required reach and clearance.
Confirm toilet seat height with the actual seat installed, not the rough-in centerline alone; seat products vary enough to push a compliant rough-in out of range.
Verify mirror bottom-edge height where mirrors are provided above accessible lavatories; the bottom edge generally can’t exceed 40 inches above the floor.
Check lavatory knee clearance with a physical mockup or template, not just a drawing dimension, since apron depth and pipe insulation eat into that space fast.
Test operable parts with a force gauge. Faucets, flush valves, and dispenser levers all need to operate at 5 pounds of force or less.
Confirm shower seat and grab bar placement against the actual installed shower pan, since pan dimensions sometimes shift during value engineering.
Walk the accessible route from the building entrance to the restroom to confirm nothing along the path, thresholds, hardware, or clear width, got missed during other trade work.
Pro Tip: Run this checklist after rough-in plumbing and framing but before drywall closes the walls. Every item on this list is cheap to fix before finishes go up and expensive after.
Coordination between trades matters more than any single measurement. Plumbing rough-in locations, carpentry blocking, and finish installation all have to agree on the same set of dimensions, and the most common source of failed inspections is one trade working from an outdated version of the plan while another trade has already moved on to the current one.
From Standards to Site: How Ada Bathroom Projects Actually Get Built
Reading the Standards is one thing. Building to them, on budget, without rework, is another. Djcustomcontracting approaches ADA bathroom work as a sequence of checkpoints rather than a single build phase, because most compliance failures trace back to a decision made in an earlier phase that nobody revisited.
A typical project moves through site assessment first, measuring existing conditions against the Standards before a single wall comes down. Next comes plan and spec compliance review, checking door swings, fixture layouts, and turning space against both the federal Standards and applicable local codes. Permitting coordination follows, working directly with plan reviewers to resolve questions before submittal rather than after rejection. Rough-in and blocking come next, the phase where grab bar anchorage gets locked in structurally. Finish installation follows, and a pre-inspection verification walkthrough closes the loop, catching drift before the inspector does.
Cost and timeline on these projects usually come down to a handful of drivers: whether drains need to be relocated to hit accessible clearances, whether floor slopes need correction for a roll-in shower, how much wall reinforcement the grab bar layout requires, waterproofing scope in wet areas, and fixture lead times, which have stretched longer across the industry in recent years. Our bathroom remodel cost guide breaks down how those variables typically shift a project budget.
Property owners and facility managers working on commercial spaces should loop in a licensed contractor with ADA-specific renovation experience before finalizing any layout, since the bathroom remodeling services that handle this work daily know where local plan reviewers tend to push back before the drawings ever reach permit submittal.
Lighting and Ventilation Standards for Accessible Bathrooms
ADA bathroom compliance doesn’t stop at fixtures and clearances. Lighting and ventilation get less attention than grab bars, but poor execution here creates real safety and usability problems for people with low vision or mobility limitations.
Adequate, even lighting matters more in accessible bathrooms than standard ones because users navigating with limited vision rely on consistent illumination to identify fixture locations, floor transitions, and grab bar positions. Avoid harsh shadows near the toilet and shower areas, and skip motion-sensor lighting with short timeout windows. Someone transferring slowly from a wheelchair to a shower seat needs the light to stay on longer than a typical occupancy sensor allows.
Light switches and any manual lighting controls fall under the same operable parts rule that governs faucets and flush valves: mounted within accessible reach range and operable with one hand, without requiring tight grasping, pinching, or wrist twisting.
Ventilation requirements in ADA-compliant bathrooms are primarily driven by local mechanical and building codes rather than the ADA Standards themselves, but accessible design intersects with ventilation in a practical way. Exhaust fan controls need to meet the same reach-range and force requirements as light switches, and fan placement shouldn’t interfere with the required clear floor space or turning circle. In a compact accessible bathroom, it’s easy to place a ceiling fan housing or duct run in a spot that later conflicts with grab bar blocking or a light fixture positioned within the reach range. Coordinate mechanical and electrical rough-in against the accessible layout before either trade commits to their runs.
Keeping Ada Bathrooms Compliant After Construction
Compliance isn’t a one-time event captured at final inspection. Grab bars loosen, signage falls off doors, and dispensers get remounted by well-meaning maintenance staff in the wrong spot. A restroom that passed inspection five years ago can drift out of compliance without anyone noticing until a complaint or an audit surfaces it.
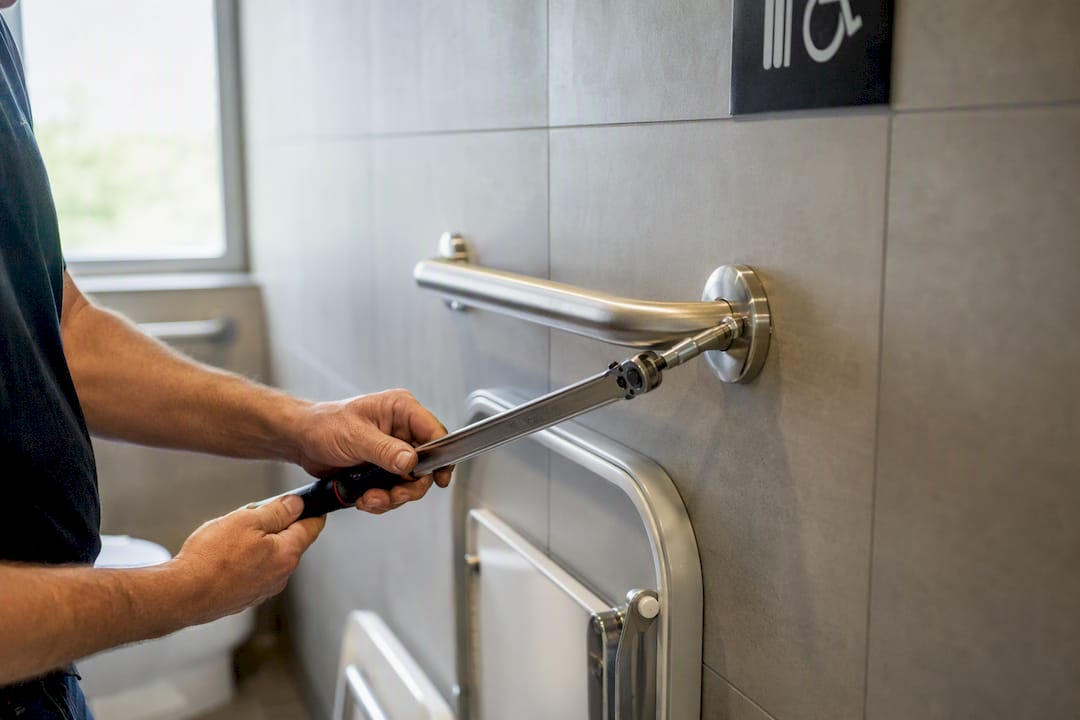
Facility managers should build a periodic inspection into their standard maintenance rotation, not just their initial construction punch list. A practical cadence looks like a quarterly visual check of grab bar tightness, signage condition, and clear floor space (storage carts and supply bins have a way of migrating into turning circles), paired with an annual detailed measurement audit using the same checklist a contractor would run before initial inspection.
Pay particular attention any time a maintenance crew replaces a fixture. A new soap dispenser, paper towel holder, or faucet installed without checking reach-range and force requirements can quietly undo years of compliance. The same goes for repainting or re-tiling work that touches signage; if a sign gets removed for painting, it needs to go back in the exact compliant location, not wherever’s convenient.
Document every inspection and any corrective action taken. Beyond the practical value of a maintenance log, that documentation becomes valuable evidence of good-faith compliance efforts if a complaint or dispute ever arises. Buildings that treat ADA compliance as a fixed installation rather than an ongoing responsibility are the ones that end up facing costly retrofits down the line.
Primary Standards to Download for Plan Review
Keep these three resources saved locally and quote exact section numbers when submitting plans, since generic references slow down reviewers.
The U.S. Access Board’s toilet rooms guide breaks down Chapter 6 scoping and technical requirements for toilet rooms in plain language. The 2010 ADA Standards for Accessible Design from the Department of Justice remain the enforceable federal text every plan should reference by section number. FIG.29 gives the exact grab bar diagrams inspectors and reviewers expect your drawings to match. Save all three as PDFs before you start plan submittal; citing “§604.5.1” directly in your drawing notes moves review along faster than a paraphrased description ever will.
What This Guide Reveals About ADA Compliance in Practice
Most ADA bathroom failures aren’t the result of ignorance about the big numbers. Everyone in this industry knows the 60-inch turning circle and roughly where grab bars go. What actually causes rework is the assumption that federal compliance is the finish line, when local code adoption, blocking decisions made weeks before fixtures arrive, and honest classification of single-user versus multi-user scoping do the real damage.
The conventional advice, “follow the ADA Standards,” undersells how much local variation exists. A contractor who treats ICC A117.1 or IBC overlays as an afterthought will get sent back to the drawing board more often than one who calls the local plan reviewer before finalizing layouts. That single phone call, made early, prevents more redesign than any measurement chart.
If there’s one priority worth putting above the rest, it’s blocking. Grab bar placement decided after walls close is the single most expensive category of ADA rework in the field, and it’s entirely preventable with five minutes of planning during framing.
— DJ
Get ADA-Compliant Bathrooms Built Right the First Time
Getting the measurements right on paper is one thing. Getting blocking, rough-in plumbing, and finish trades to execute those measurements correctly on site, without the rework that eats budgets and delays certificates of occupancy, is where most ADA bathroom projects actually succeed or fail. Djcustomcontracting builds ADA compliance into every phase of a commercial renovation, from initial site assessment through pre-inspection verification, instead of treating it as a final punch-list item.
That process matters most for property owners and facility managers juggling permitting deadlines alongside tenant or occupancy pressure, where a failed inspection means lost time nobody budgeted for. Whether you’re retrofitting an existing commercial restroom, planning a new build, or adding accessible facilities as part of a larger addition, our commercial renovation services coordinate the plan review, permitting, and construction sequencing so grab bar blocking, clearances, and fixture placement land right the first time. If your next project involves an addition or alteration that touches an existing restroom, our addition and alteration contracting team can walk the site with you and flag compliance issues before they show up on an inspector’s clipboard. Reach out for a site assessment and get a clear scope before your next permit submittal.
Sources
Recommended


Comments