
Commercial Damage Restoration Process: 2026 Guide
- DJ Custom Contracting

- 6 days ago
- 9 min read
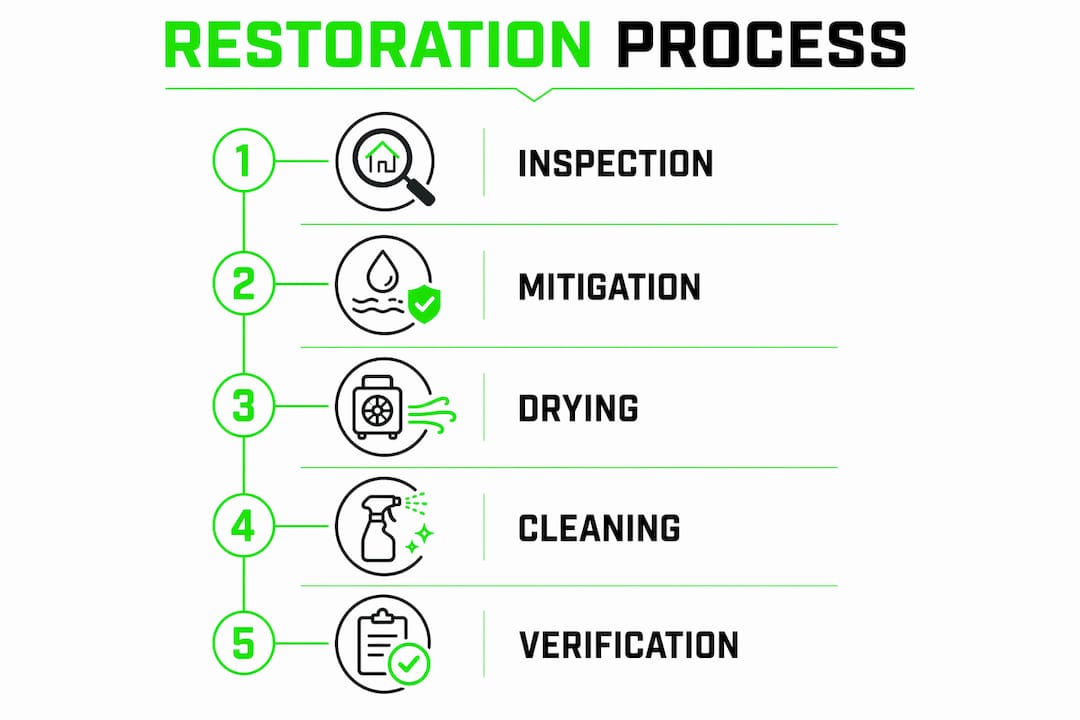
The commercial damage restoration process is a structured, phase-based approach to evaluating, mitigating, and returning a damaged commercial property to its pre-loss condition. Governed by standards like ANSI/IICRC S500, the process moves through six defined stages: inspection, mitigation, drying, cleaning, repair, and verification. Each stage depends on the one before it. Property managers and business owners who understand this workflow make faster decisions, reduce downtime, and build stronger insurance cases from day one.
What does the commercial damage restoration process involve?
The commercial damage restoration process is the industry’s recognized framework for recovering properties after water, fire, mold, or structural damage. Restoration contractors use it to scope work, set drying targets, coordinate trades, and verify completion at each phase. The process is not a single event. It is a sequenced workflow where skipping or rushing a phase creates compounding problems downstream.
Restoration professionals certified by the IICRC, holding credentials such as WRT (Water Restoration Technician), AMRT (Applied Microbial Remediation Technician), and MWR (Master Water Restorer), are trained to execute this workflow to IICRC S500 standards. Those credentials signal that a contractor understands contamination categories, moisture science, and the documentation requirements that insurance carriers expect. For property managers evaluating vendors, IICRC certification is a concrete differentiator, not a marketing label.
The commercial damage restoration workflow in 2026 also reflects a sharper focus on business continuity. Phased sequencing, containment zones, and partial reopening strategies are now standard practice on commercial projects, not optional upgrades. The goal is to restore critical operations as quickly as possible while the full project continues around them.
How to conduct damage inspection and assessment in commercial properties
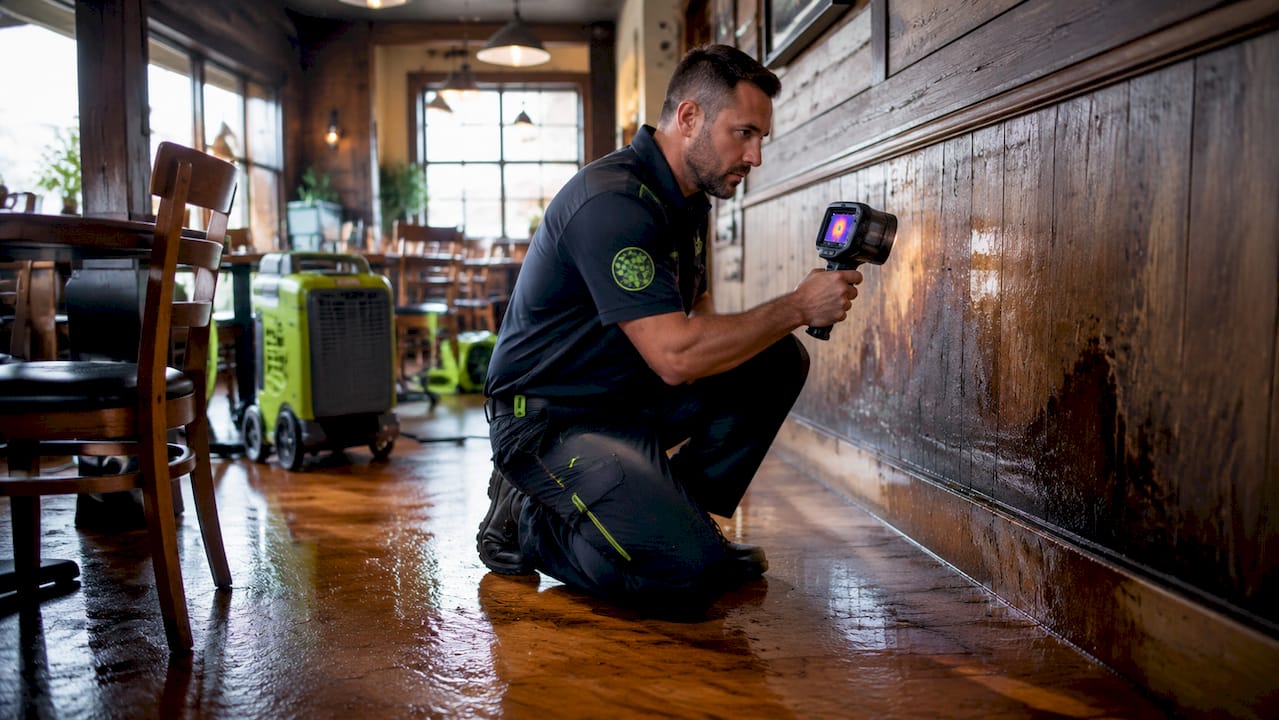
Damage assessment is the foundation of every restoration project. Without an accurate scope, every subsequent phase is guesswork. A thorough assessment includes visual inspection, moisture mapping, hazard identification, and classification of damage type and severity.
Restoration teams use thermal imaging cameras and calibrated moisture meters to detect water intrusion behind walls, under flooring, and inside ceiling assemblies. Thermal imaging and moisture mapping determine damage category, identify affected building systems, assess salvageability, and flag safety concerns. This data directly shapes the restoration scope and budget.
The IICRC S500 classifies water damage into three categories based on contamination level and four classes based on evaporation load. Category 1 is clean water from a supply line. Category 3 is grossly contaminated water from sewage or floodwater. The classification determines what personal protective equipment crews need, what materials can be dried versus demolished, and what cleaning protocols apply. Getting this wrong at the assessment stage leads to failed clearances and costly rework.
Key steps in a commercial damage assessment include:
Visual inspection of all affected areas, including concealed spaces above ceilings and below raised floors
Moisture mapping using pin and pinless meters to document moisture content in structural materials
Thermal imaging to identify hidden moisture pockets not visible to the naked eye
Hazard identification covering electrical systems, structural integrity, and potential asbestos or lead-containing materials
Photographic documentation of all findings with timestamps and measurements recorded
Pro Tip: Document the pre-existing conditions of unaffected areas during the initial assessment. This protects you from disputes about damage scope if the project extends into adjacent spaces.
Steps to mitigate damage and stabilize the property
Mitigation begins the moment the assessment identifies active damage. The objective is to stop further loss, not to restore. Every hour of delay in mitigation expands the affected area and increases the total project cost.
Emergency mitigation steps follow a defined sequence:
Secure utilities. Shut off water supply to stop active flooding. Verify electrical safety before crews enter wet areas.
Perform water extraction. Use truck-mounted or portable extraction units to remove standing water from floors and carpeting.
Establish containment. Install plastic barriers and set up negative air pressure machines to isolate affected zones from clean areas.
Deploy drying equipment. Place commercial-grade air movers and refrigerant or desiccant dehumidifiers based on the room’s evaporation load and damage class.
Board up or tarp. Secure any exterior breaches from fire, storm, or impact damage to prevent weather intrusion.
Document equipment placement. Record the location, model, and settings of every piece of drying equipment deployed.
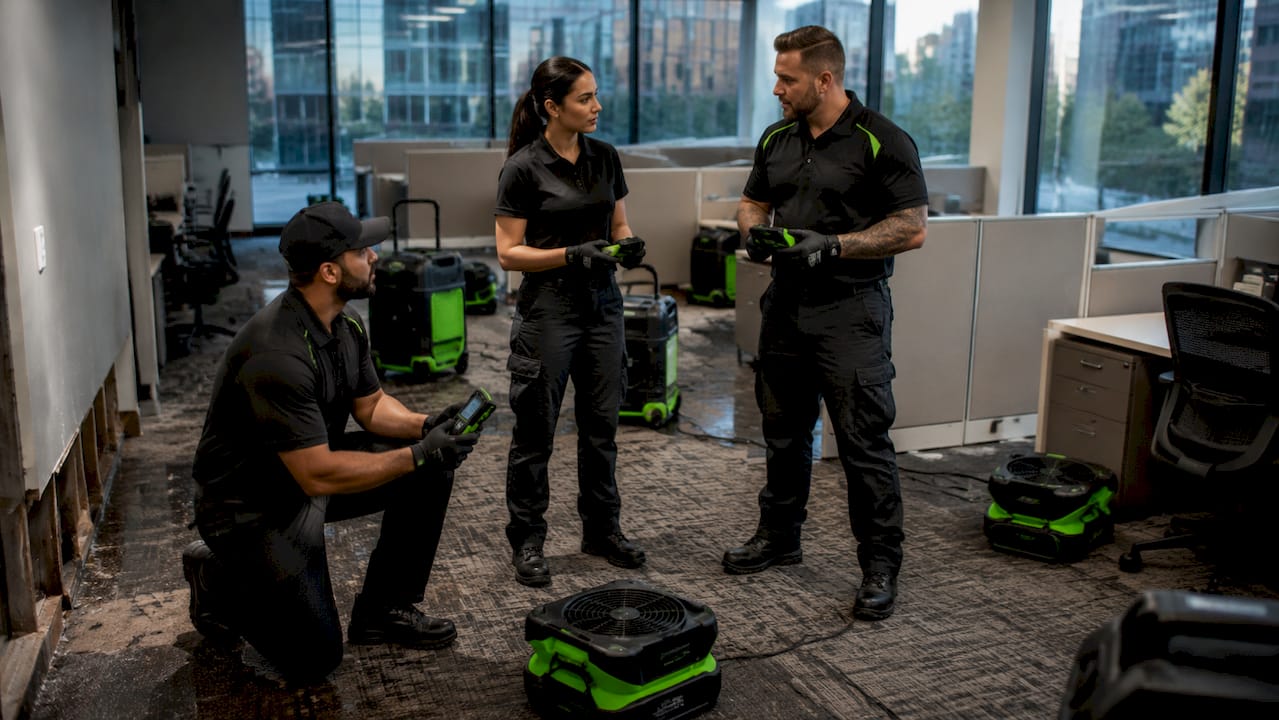
Containment strategy is particularly important in commercial settings. A retail store, medical office, or restaurant cannot simply shut down every zone. Plastic sheeting with zipper access panels and HEPA-filtered negative air machines allow unaffected areas to remain operational while mitigation proceeds in adjacent spaces. This approach is central to the phased restoration workflow that minimizes operational disruption.
Pro Tip: Place air movers at a 45-degree angle to walls and position dehumidifiers centrally within the drying chamber. Equipment placement diagrams created at setup become critical documentation artifacts if the insurance carrier requests proof of mitigation effort.
Drying, cleaning, and restoration techniques in the commercial damage workflow
Structural drying is the most technically demanding phase of the facility damage restoration process. It requires setting measurable targets, monitoring daily, and adjusting equipment based on data, not intuition.
Setting drying goals versus dry standards
Drying goals and dry standards are distinct benchmarks. The dry standard is the moisture content of an unaffected reference material in the same building. The drying goal is the target moisture content set above the dry standard to guide equipment removal timing. Setting a drying goal above the dry standard prevents microbial growth while allowing safe, timely demobilization of equipment. Documenting both values at project initiation is a professional requirement under IICRC S500.
Monitoring and adjusting the drying process
Daily moisture readings allow crews to track drying progress, identify stalled areas, and adjust equipment placement or settings before problems compound. Readings are logged by location, material type, and date. This creates a defensible drying record that supports insurance billing and demonstrates due diligence.
Drying phase activity | Purpose | Frequency |
Baseline moisture readings | Establish starting point for all monitored materials | Day 1 |
Daily moisture logs | Track progress and identify stalled drying zones | Daily |
Equipment adjustment | Reposition air movers or add dehumidifiers based on data | As needed |
Drying goal verification | Confirm materials have reached target moisture content | Before demobilization |
Cleaning and sanitizing protocols
Cleaning protocols vary by damage type. Water damage from a clean source requires antimicrobial treatment of affected surfaces. Fire damage requires dry chemical sponging of soot, HEPA vacuuming, and odor neutralization using thermal fogging or hydroxyl generators. Mold remediation follows IICRC S520 protocols, including physical removal of contaminated materials and air scrubbing. The post-construction cleaning process that follows reconstruction is a separate phase requiring its own scope and scheduling.
Phased restoration sequences critical areas first. A commercial kitchen, server room, or patient care area gets priority over storage or secondary office space. Coordinating multiple trades, including plumbers, electricians, drywall crews, and painters, requires a detailed schedule with clear access windows and staging areas defined in advance.
How documentation and verification support insurance claims
Documentation is not administrative overhead. It is the operational record that determines whether an insurance claim is approved quickly or disputed for months. Thorough documentation reduces review disputes and accelerates carrier approvals by giving adjusters exactly what they need without back-and-forth requests.
The core documentation artifacts for a commercial restoration project include:
Loss photos taken at the time of discovery and throughout each phase, organized by date and location
Moisture logs with readings by material type, location, and date from day one through demobilization
Equipment placement records showing what was deployed, where, and when
Scope of work documents defining what will be restored, replaced, or demolished
Communication logs capturing all conversations with the carrier, property owner, and subcontractors
Clearance testing results for mold, air quality, or structural verification before reconstruction begins
Verification gates are formal checkpoints built into the restoration process framework to confirm that each phase meets its objectives before the next begins. Gate-based handoffs prevent scope creep and failed clearances. For example, no reconstruction should begin until drying goals are verified and documented. No final billing should be submitted until clearance testing confirms the property meets pre-loss standards.
“Investment in thorough documentation improves carrier relationships by reducing disputes, speeding approvals, and building long-term trust with adjusters.” — Documentation and carrier relationships
For guidance on how insurance intersects with restoration project costs and coverage, the role of insurance in construction is a practical reference for property managers navigating claims.
How to minimize downtime during commercial property restoration
Minimizing downtime is the primary business concern for property managers during any restoration project. Phased restoration can shorten time-to-reopening from months to weeks by prioritizing business continuity over linear project completion. That difference has direct revenue implications for any operating business.
A practical downtime reduction plan follows these steps:
Map critical zones. Identify which areas must reopen first based on revenue impact, regulatory requirements, or operational dependency.
Sequence restoration around those zones. Schedule mitigation, drying, and reconstruction in critical areas before secondary spaces.
Evaluate HVAC systems early. Contaminated ductwork spreads damage to clean areas. Isolate or shut down affected HVAC branches before they become a secondary loss.
Plan access logistics in advance. Multi-trade coordination requires scheduling keys, alarm codes, loading zone access, and equipment staging areas before work begins. Delays in access planning add days to the project timeline.
Communicate proactively with staff and tenants. Weekly written updates on project status, expected completion dates, and access restrictions reduce confusion and maintain trust.
Pro Tip: Request a phased completion schedule from your restoration contractor before work begins. A contractor who cannot produce one has not planned for your business continuity, only for their own workflow.
Key takeaways
The commercial damage restoration process succeeds when inspection, drying goals, documentation, and phased sequencing are executed in order, with verified handoffs at every stage.
Point | Details |
Start with accurate assessment | Use thermal imaging and moisture mapping to classify damage before any mitigation begins. |
Set documented drying goals | Establish drying goals above the dry standard on day one to guide equipment removal and prevent microbial growth. |
Document every phase | Moisture logs, equipment records, and loss photos are the artifacts that resolve insurance disputes and speed approvals. |
Use verification gates | Confirm drying goals and clearance criteria are met before moving to reconstruction to avoid scope creep. |
Prioritize critical zones | Sequence restoration around revenue-critical areas to reopen faster and reduce operational impact. |
What I’ve learned managing commercial restoration projects
After years of working through commercial restoration projects, the pattern that causes the most damage is not bad execution. It is unclear handoffs between phases. A crew finishes mitigation, equipment gets pulled, and reconstruction starts before anyone has verified that drying goals were actually met. The result is mold behind new drywall, failed clearances, and a project that costs twice what it should have.
The restoration workflow clarity that separates successful projects from failed ones comes down to one discipline: treating every phase transition as a formal gate, not an informal assumption. That means signed-off moisture logs before reconstruction, documented clearance results before final billing, and a written scope that everyone on the project has read.
I have also seen property managers underestimate documentation until they are in a dispute with a carrier. The contractors who build documentation habits from day one, not as a reaction to a dispute, are the ones whose claims close fastest. It is an operational discipline that pays dividends every time.
If you are managing a restoration project right now, the most valuable thing you can do today is request the baseline moisture readings and drying logs from your contractor. If they cannot produce them, that is the problem you need to solve before anything else.
— DJ
Restore your commercial property with Djcustomcontracting
When property damage disrupts your operations, you need a contractor who understands both the restoration process and the business pressure behind it. Djcustomcontracting has provided commercial restoration services to property owners and managers since 2018, handling phased restoration, multi-trade coordination, and documentation from first inspection through final verification.

Whether you are dealing with water intrusion, fire damage, or structural repairs, Djcustomcontracting manages the full workflow so you can focus on your business. For a broader look at what restoration involves in the New York area, the NYC damage restoration guide covers the process in detail. Contact Djcustomcontracting to discuss your project and get a clear plan for recovery.
FAQ
What is the commercial damage restoration process?
The commercial damage restoration process is a structured, phase-based workflow that takes a damaged property from initial inspection through mitigation, drying, cleaning, reconstruction, and final verification. It follows standards set by the IICRC, including S500 for water damage and S520 for mold remediation.
How long does commercial water damage restoration take?
Timeline depends on damage category, affected area size, and restoration sequencing. Phased restoration can reduce time-to-partial-reopening from months to weeks by prioritizing critical zones before completing secondary areas.
What documentation is needed for a commercial insurance claim?
Carriers require loss photos, moisture logs with daily readings, equipment placement records, scope of work documents, and clearance testing results. Organized documentation reduces disputes and accelerates claim approvals.
What are IICRC water damage categories?
The IICRC S500 defines three water damage categories: Category 1 is clean water, Category 2 is gray water with some contamination, and Category 3 is grossly contaminated water from sewage or flooding. The category determines cleaning protocols, required protective equipment, and which materials can be dried versus removed.
When should reconstruction begin after water damage?
Reconstruction should begin only after drying goals are verified and documented through moisture readings. Starting reconstruction before materials reach target moisture content risks trapping moisture behind new finishes, which leads to mold growth and failed clearances.
Recommended
Comments