
Residential Renovation Process: A Homeowner's Guide
- DJ Custom Contracting

- 4 days ago
- 9 min read

The residential renovation process is the structured sequence of steps homeowners and property managers follow to update, repair, or improve a property, covering everything from initial goal setting and budgeting through permits, construction phases, and final inspections. Understanding each phase before breaking ground is what separates projects that finish on time and on budget from those that spiral into costly delays. Whether you are planning a kitchen overhaul, a full-floor remodel, or a structural addition, the home remodeling process follows a predictable order. Skipping or rushing any phase creates problems that compound quickly, and those problems almost always cost more to fix than they would have cost to prevent.
What are the key phases in the residential renovation process?
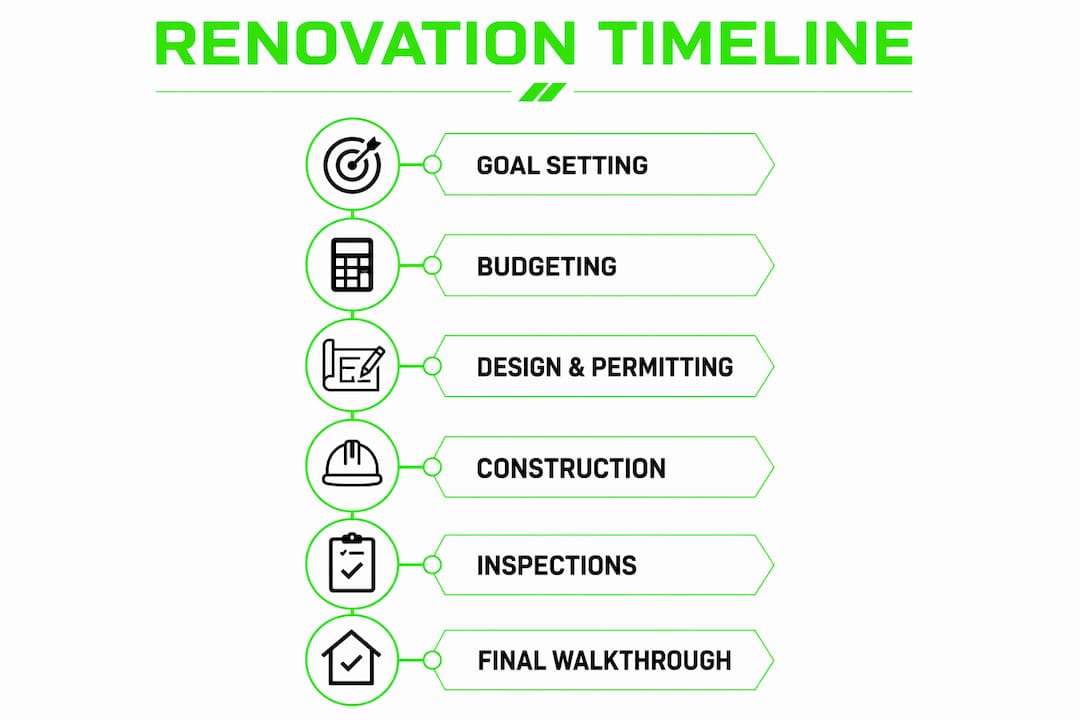
The residential renovation steps follow a defined sequence: define goals and scope, set a budget, complete design and materials selection, choose and contract a general contractor, secure permits and approvals, prepare the home and order long-lead items, begin demolition, complete structural and MEP (mechanical, electrical, plumbing) rough-ins, install insulation and drywall, add interior finishes and fixtures, complete flooring, trim, and paint, then close with a punch list, final inspections, and project walkthrough.
Each step builds directly on the one before it. Jumping ahead, such as ordering materials before the design is finalized or starting demolition before permits are approved, creates rework and schedule resets that are expensive to recover from.
Here is how each phase works in practice:
Define goals and scope. Write down exactly what you want to change, why, and what success looks like. Vague scope is the single most common cause of budget overruns.
Set a budget. Establish your total spending limit, including a contingency reserve. This number drives every decision that follows.
Design and materials selection. Work with an architect, designer, or design-build contractor to produce drawings and a materials list. Finalize selections before construction starts.
Contractor selection and contracting. Collect at least three bids, verify licenses and insurance, and sign a detailed contract that specifies scope, schedule, and payment terms.
Permits and approvals. Submit drawings to your local building department for review. Do not start construction until permits are issued.
Home preparation and procurement. Protect or relocate furniture, order long-lead items, and confirm subcontractor schedules.
Demolition. Remove existing finishes, fixtures, and structural elements as required by the approved plans.
Structural and MEP rough-ins. Complete framing, electrical, plumbing, and HVAC work before any walls are closed.
Insulation and drywall. Install after rough-in inspections pass. Closing walls before inspection approval risks costly tear-outs.
Interior finishes, flooring, trim, and paint. The visible work that transforms the space.
Punch list, final inspection, and closeout. Walk the project with your contractor, document every incomplete or deficient item, and confirm all corrections before releasing final payment.
Pro Tip: Lock your scope and material selections before signing a construction contract. Changes made after construction begins are processed as formal change orders, and each one adds cost and time to the project.
How long does each phase of a residential renovation typically take?
Timeline expectations are one of the most misunderstood parts of the home remodeling process. Many homeowners budget time for construction but underestimate how long planning, design, and permitting take before a single wall comes down.
A realistic renovation timeline breaks down as follows:
Phase | Typical Duration |
Goal setting and scope definition | 1 to 2 weeks |
Budget development | 2 to 4 weeks |
Design and construction drawings | 4 to 8 weeks |
Permit review and approval | 4 to 6 weeks |
Construction (varies by project size) | 6 weeks to 12 months |
Punch list and closeout | 1 to 2 weeks |
The planning and permitting phases alone can consume three to five months before construction begins. That timeline is not a bureaucratic inconvenience. It reflects the real work required to produce accurate drawings, coordinate with engineers, and satisfy the local building department’s review process.
Material delays and subcontractor scheduling are the two most common causes of construction phase overruns. Fixtures, appliances, and specialty materials are frequently back-ordered or discontinued, and subcontractors often work across multiple projects simultaneously. Both risks are manageable when you plan for them, but they catch homeowners off guard when treated as afterthoughts.
Inspection milestones also control pacing. Rough-in inspections must be scheduled and passed before insulation or drywall can proceed. If your inspector has a two-week backlog, that wait is built into your timeline whether you planned for it or not.
Pro Tip: Experienced renovators start the permit process six to twelve months before their target construction start date. If you want to break ground in spring, submit your permit application in the fall.
What budgeting considerations should homeowners keep in mind?
A realistic budget is the foundation of a successful renovation. The most common financial mistake homeowners make is budgeting only for the work they can see, without accounting for the costs that surface once walls open.
The main cost categories in any residential remodel include:
Design and drawings. Architect or designer fees typically range from a flat fee to a percentage of construction cost, depending on project complexity.
Permits and fees. Building permit fees vary by jurisdiction and project scope. Factor these in early because they are non-negotiable costs.
Materials. Includes structural materials, finishes, fixtures, appliances, and specialty items. Prices fluctuate, so get quotes close to your procurement date.
Labor. General contractor markup plus subcontractor costs for electrical, plumbing, HVAC, tile, and other trades.
Contingency reserve. The 10% to 20% contingency rule is standard practice. For homes built before 1980, lean toward 20% because hidden issues, including outdated wiring, galvanized pipes, and deteriorated framing, are common discoveries after demolition.
Getting multiple quotes from licensed contractors is not just about finding the lowest price. It gives you a realistic market rate for your scope of work and reveals whether your budget is aligned with what the project actually costs. A single quote with no comparison leaves you with no way to evaluate whether you are being charged fairly.
For detailed guidance on setting and managing your numbers, the renovation budget planning guide from Djcustomcontracting covers contingency planning and cost control in depth.
What are the typical permit and inspection requirements?
Permits are not optional for most residential renovation work. Structural changes, electrical upgrades, plumbing modifications, and HVAC work all require permits in virtually every jurisdiction in the United States.
The permit process works as follows:
You submit construction drawings to the Authority Having Jurisdiction (AHJ), which is your local building department.
The AHJ reviews plans for compliance with the International Residential Code (IRC) and any local amendments.
Once approved, permits are issued and posted at the job site.
Inspections occur at defined milestones: rough framing, rough mechanical and electrical, insulation, and final inspection before occupancy.
Bypassing permits does not save money. Unpermitted work can trigger stop-work orders, require demolition of completed work, create title and insurance complications, and expose homeowners to liability if something fails. The cost of doing it right is always lower than the cost of fixing it after the fact.
Inspections set the pacing for permitted work. Projects cannot advance past rough framing or rough-in stages without AHJ approval. This is why scheduling inspections promptly and building inspection wait times into your timeline is critical to keeping the project moving.
The permit and inspection requirements for structural, electrical, plumbing, and HVAC work are consistent across most U.S. jurisdictions, though local amendments vary. Always confirm requirements with your local building department before starting design.
How can homeowners manage the construction phase effectively?
The construction phase is where plans meet reality, and where most projects encounter their first real complications. Managing this phase well requires attention to sequencing, communication, and documentation.
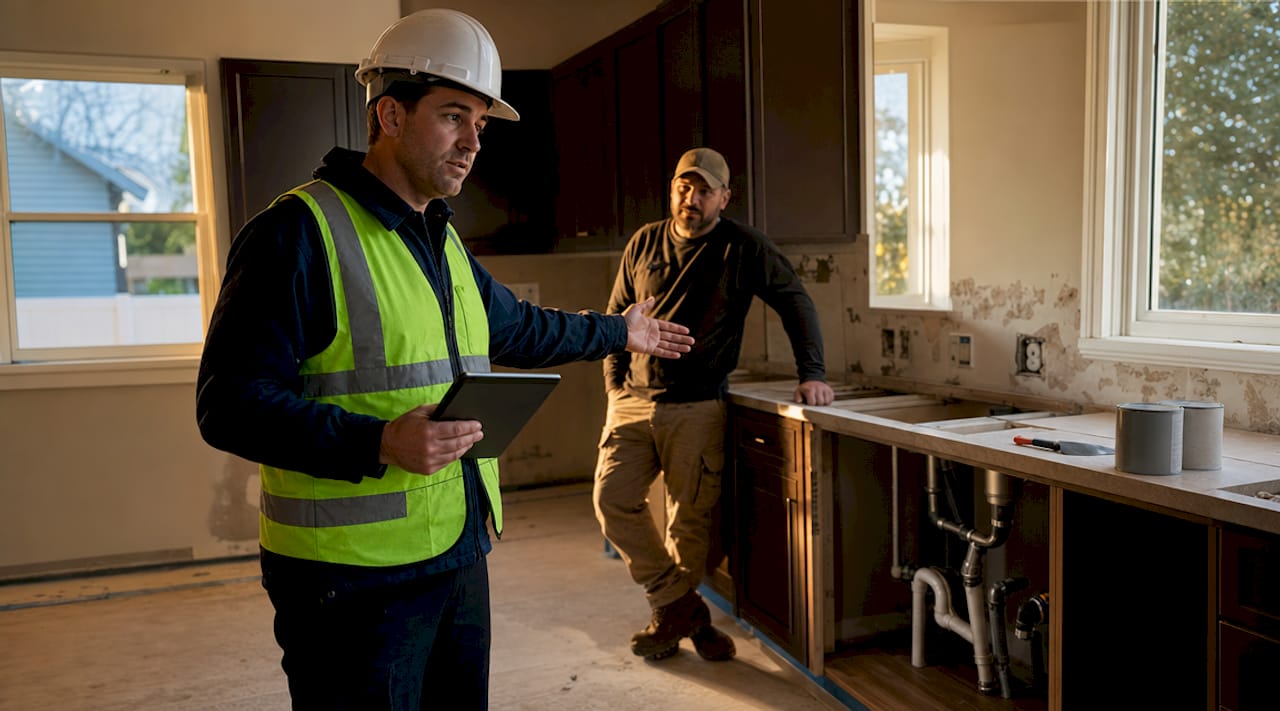
The single most important sequencing rule is this: all electrical, plumbing, and HVAC rough-ins must be fully installed and pass inspection before drywall or insulation is closed up. Closing walls before rough-in approval risks a failed inspection that requires tearing out completed work. That scenario adds cost, time, and frustration that is entirely avoidable.
Practical steps for managing construction effectively:
Order long-lead items immediately after permits are approved. Fixtures, custom cabinetry, specialty tile, and appliances can take weeks or months to arrive. Procurement delays are among the most common causes of construction phase overruns.
Document every change in writing. Any deviation from the original scope should be processed as a formal change order signed by both parties. Verbal agreements about changes are a frequent source of disputes at closeout.
Schedule regular check-ins with your contractor. Weekly site visits or progress calls keep you informed and give you the opportunity to catch issues before they become expensive corrections.
Conduct a thorough final walkthrough. Before releasing final payment, walk the project and generate a punch list of every incomplete or deficient item. The punch list is a formal control point. All items must be resolved before final payment is released.
Pro Tip: Effective change order documentation protects both you and your contractor. Every change, no matter how small it seems, should be written down, priced, and signed before work proceeds.
For a detailed look at how sequencing and material ordering work in practice, the interior remodeling workflow guide from Djcustomcontracting covers the NY and NJ market specifically.
Key takeaways
A successful residential renovation depends on locking scope and budget before construction starts, securing permits before breaking ground, and managing sequencing and procurement as critical path items throughout the project.
Point | Details |
Follow the full sequence | Skipping phases like permitting or rough-in inspection creates rework that costs more than the time saved. |
Budget with contingency | Reserve 10% to 20% above your base budget, leaning toward 20% for homes built before 1980. |
Start permits early | Submit permit applications six to twelve months before your target construction start to protect your schedule. |
Order long-lead items first | Procure fixtures, appliances, and specialty materials immediately after permits are approved to prevent delays. |
Use the punch list as a control point | Resolve all punch list items before releasing final payment to avoid post-project disputes. |
What I’ve learned from years of managing residential renovations
After working on residential and commercial projects since 2018, the pattern I see most often is this: homeowners who struggle with their renovations almost always had a scope problem, not a contractor problem. They started construction with a vague idea of what they wanted, made decisions under pressure during the build, and ended up with change orders that blew the budget.
The homeowners who finish on time and on budget are the ones who did the hard work upfront. They defined exactly what they wanted, selected materials before signing a contract, and understood that the permit process is not a formality. It is a quality control system that protects them.
I have also seen what happens when rough-in inspections are skipped or rushed. Walls get closed, inspectors flag the work, and suddenly a two-day correction becomes a two-week delay with tear-out costs on top. The sequencing rules exist for good reason, and respecting them is the fastest path through construction.
One more thing worth saying directly: communication with your contractor is not a soft skill. It is a project management tool. Weekly check-ins, written change orders, and a clear punch list process are what separate a smooth closeout from a contentious one. If your contractor resists documentation, that is a signal worth paying attention to before you sign anything.
— DJ
How Djcustomcontracting supports your renovation from start to finish

Djcustomcontracting has been managing residential renovation projects in the New York and New Jersey area since 2018, handling everything from permit acquisition and construction sequencing to final inspections and project closeout. Whether you are planning a kitchen remodel, a full-floor renovation, or a structural addition, the team at Djcustomcontracting brings the trades knowledge and code compliance experience to keep your project on schedule and within budget.
If you are ready to move forward, the interior renovation services page covers the full scope of what Djcustomcontracting offers for residential projects. For homeowners considering additions or structural changes, the addition and alteration services page outlines how those projects are managed from design through final inspection. Contact Djcustomcontracting to schedule a consultation and get a project quote.
FAQ
What is the first step in the residential renovation process?
The first step is defining your goals and scope in writing. A clear, specific scope prevents budget overruns and miscommunication with contractors before any work begins.
Do all home renovations require permits?
Structural, electrical, plumbing, and HVAC work require permits in virtually every U.S. jurisdiction. Cosmetic updates like painting or replacing flooring typically do not, but always confirm with your local building department.
How much contingency should I add to my renovation budget?
The standard recommendation is a 10% to 20% contingency reserve. For homes built before 1980, budget closer to 20% because hidden issues behind walls are common once demolition begins.
Why can’t drywall go up before the rough-in inspection?
All electrical, plumbing, and HVAC rough-ins must be inspected and approved before walls are closed. Installing drywall before inspection approval risks a failed inspection that requires tearing out completed work at significant cost.
How long does the full renovation process take from planning to closeout?
Planning, design, and permitting alone can take three to five months. Construction ranges from six weeks to twelve months depending on project scope, with punch list and closeout adding one to two weeks at the end.
Recommended
Comments