
Step by Step Renovation Guide for Homeowners
- DJ Custom Contracting

- 1 day ago
- 8 min read

A step-by-step renovation guide defines the essential phases and decisions required to renovate any residential or commercial property without losing control of your budget or timeline. Renovation projects fail most often not from bad craftsmanship but from poor planning. Following a structured process, from goal setting and budgeting through contractor selection and final walkthrough, gives you the control to deliver quality results. Djcustomcontracting has managed projects of every scale since 2018, and the pattern is consistent: methodical planning separates successful renovations from costly ones.
What does a step by step renovation guide actually cover?
A renovation guide is the industry term for a phased project management framework applied to construction and remodeling. It covers every decision point from the first sketch on paper to the final inspection. The guide you follow determines whether your project finishes on time, on budget, and to the standard you expected.
Most homeowners underestimate how many decisions come before a single wall gets touched. Scope, budget, permits, contractor selection, and sequencing all happen before demolition begins. Getting these right is what separates a smooth room renovation process from a stressful one.
How do you set clear renovation goals and build your wish list?
The first step in any home renovation checklist is separating what you need from what you want. Jean Brownhill recommends creating two distinct lists: a definitive list of required renovations and a separate wish list of optional improvements. That separation gives you a negotiating tool when contractor bids come in higher than expected.
Your required list covers structural repairs, code compliance, safety upgrades, and anything that affects habitability. Your wish list covers aesthetic upgrades, added features, and quality-of-life improvements. When bids exceed your budget, you cut from the wish list first, not the required list.
Required renovations: roof repairs, plumbing leaks, electrical panel upgrades, HVAC replacement, structural fixes
Wish list items: custom cabinetry, premium tile, open-concept wall removal, smart home features, landscaping
Negotiation use: share both lists with contractors so they can price each category separately
Pro Tip: Ask each contractor to bid the required scope and the wish list scope as separate line items. You will see exactly what each upgrade costs and can make informed cuts without renegotiating the entire contract.
The must-have vs. wish-list approach also helps you align expectations with your household before work begins. Disagreements about scope mid-project are one of the most common causes of budget overruns. Settle them on paper first.

What does a realistic renovation budget look like?
A realistic renovation budget accounts for every cost category and includes a reserve for surprises. Start with a spreadsheet that breaks down labor, materials, permits, design fees, and temporary housing if needed. Vague budgets produce vague results.
The 30% renovation rule states you should not spend more than 30% of your home’s current market value on remodeling any single space. This guideline protects you from over-improving relative to what the property can support in resale value. A $400,000 home should not carry a $200,000 kitchen renovation.
Building your budget step by step
List every cost category: labor, materials, permits, design, demolition, disposal, and temporary accommodations
Get at least three bids: compare line items, not just totals, to understand where costs differ
Apply the contingency rule: set aside 10–15% above your estimated total for partial remodels; budget more for full gut renovations
Separate fixed and variable costs: permits and structural work are fixed; finishes and fixtures are variable and easier to adjust
Track spending weekly: a simple spreadsheet updated every week prevents budget drift before it becomes a crisis
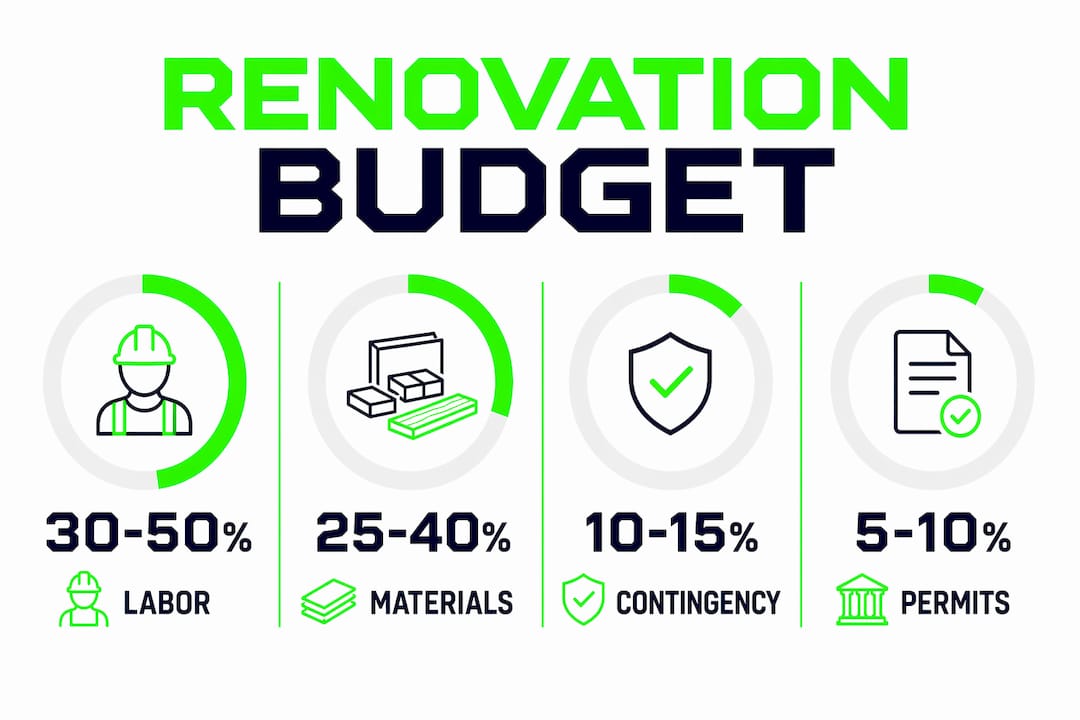
Budget category | Typical share of total cost |
Labor | 30–50% |
Materials and fixtures | 25–40% |
Permits and inspections | 3–8% |
Design and architecture | 5–15% |
Contingency reserve | 10–15%+ |
Pro Tip: Open a dedicated project checking account and run all renovation payments through it. You will have a clean record of every transaction if disputes arise, and tax documentation becomes straightforward if the property is commercial.
Unexpected conditions during demolition are common once walls and floors are opened. Hidden water damage, outdated wiring, and asbestos are real possibilities in older properties. A funded contingency reserve is not optional; it is the difference between a manageable surprise and a project shutdown.
How do you create a renovation timeline and sequence the work?
A renovation timeline organizes phases in the order they must happen to avoid rework and delays. The recommended sequence runs from planning and permits through demolition, structural and mechanical rough-ins, insulation and drywall, finishes, and final punch list. Skipping or reordering phases causes costly backtracking.
A well-organized timeline broken into logical phases helps manage milestones and prevents delays. Each phase should have a start date, an end date, and a clear handoff condition before the next trade enters. That structure keeps subcontractors from waiting on each other and keeps your project moving.
Planning and permits: finalize drawings, submit permit applications, and wait for approvals before any physical work begins
Demolition: remove existing finishes, fixtures, and structures as specified; document conditions before closing walls
Structural and mechanical rough-ins: framing, plumbing, electrical, and HVAC work happen before walls close
Insulation and drywall: installed after all rough-in inspections pass
Finishes: flooring, tile, cabinetry, painting, and trim in the correct sequence to avoid damage
Final punch list: address incomplete or defective items before final payment
Pro Tip: Order long-lead materials, such as custom cabinets, specialty tile, and appliances, at least 8–12 weeks before you need them on site. Supply delays are the most common cause of timeline extensions, and they are entirely preventable with early ordering.
For step by step exterior remodeling, the same sequencing logic applies. Structural repairs come before cladding, and cladding comes before painting or sealing. Refer to a house renovation stages checklist to confirm the correct order for your specific project type.
How do you hire and work with contractors effectively?
Hiring the right contractor is the single most consequential decision in any renovation. Vetted professionals with proven experience reduce risk and improve outcomes. Licensing, insurance, and references are non-negotiable screening criteria.
When evaluating candidates, look beyond price. A low bid that excludes permit fees, disposal costs, or specific finishes will cost more in the end. Compare bids line by line, not total to total.
Verify licensing and insurance: confirm the contractor holds a valid license for your jurisdiction and carries general liability and workers’ compensation coverage
Check references and past work: speak to at least two recent clients and, if possible, visit a completed project
Review the contract in detail: scope of work, payment schedule, change order process, and warranty terms must all be in writing
Establish communication protocols: construction consultant Kate Smith advises keeping all bids and change orders in writing and using a dedicated project email address for documentation
Clarify the change order process: any scope change that affects cost or timeline must be approved in writing before work proceeds
Balancing DIY renovation steps with professional work is a cost management strategy, not a compromise. Painting, demo prep, and cleanup are tasks most homeowners can handle safely. Electrical, plumbing, structural, and permit-required work should always go to licensed professionals.
What should you expect during key renovation phases?
The on-site phases of a renovation move faster than most homeowners expect, and surprises are normal. Knowing what happens in each phase helps you ask the right questions and catch problems early.
Demolition reveals the true condition of your property. Hidden water damage, mold, outdated wiring, and structural issues all become visible once finishes are removed. Document everything with photos before walls close again.
Demolition: remove existing materials carefully; photograph all exposed conditions for your records and for the contractor’s reference
Rough-in inspections: plumbing, electrical, and HVAC rough-ins require inspection approval before insulation and drywall proceed; do not skip these
Insulation and drywall: installed after all inspections pass; drywall finishing requires multiple coats and drying time before painting
Flooring and tile: installed before cabinetry in most cases; protect finished floors during subsequent trades
Painting and trim: the final interior finishes; complete before fixtures and appliances are installed to avoid masking and touch-up work
Final walkthrough: conduct a detailed inspection with your contractor, document every incomplete or defective item, and tie final payment to punch list completion
“Maintaining detailed records and written confirmations of changes and costs secures better project control throughout construction.” — Construction consultant Kate Smith
Handling delays requires a calm, documented response. When a subcontractor runs late or a material arrives damaged, record the impact on your schedule in writing and adjust downstream dates accordingly. Reactive problem-solving without documentation leads to disputes over who owes what.
Key takeaways
A successful renovation requires a clear sequence: defined goals, a funded budget with contingency, a phased timeline, vetted contractors, and documented communication at every stage.
Point | Details |
Separate needs from wants | Build two lists before bidding to protect your required scope when costs run high. |
Fund your contingency | Reserve 10–15% above estimated costs for partial remodels; more for gut renovations. |
Follow the correct sequence | Planning and permits come before demolition; rough-ins come before drywall. |
Vet every contractor | Verify licensing, insurance, and references before signing any contract. |
Document everything in writing | All change orders, bids, and approvals must be written to prevent disputes. |
What I have learned after years of renovation projects
The most common mistake I see is homeowners treating the budget as a ceiling rather than a plan. A ceiling gets hit and the project stops. A plan has contingency built in, and the project keeps moving. The 10–15% reserve is not pessimism; it is professional practice.
The second pattern I notice is underestimating the permit process. Permits exist to protect you, not slow you down. A project completed without required permits creates title problems, insurance gaps, and potential fines. Every phase of a home renovation plan should account for permit timelines from day one.
The third thing I would tell any homeowner is this: communication is the job. The best contractors I have worked with are not just skilled tradespeople. They are communicators who document changes, flag problems early, and keep clients informed. When you hire, weight communication skills as heavily as technical ability. A contractor who goes silent when problems arise will cost you far more than one who charges a slightly higher rate but keeps you in the loop every step of the way.
— DJ
Djcustomcontracting: full-service renovation support from day one
Djcustomcontracting has delivered residential and commercial renovations since 2018, covering everything from interior gut remodels to exterior upgrades, additions, and DOB violation removal.

Whether you are managing a single-room update or a full commercial buildout, Djcustomcontracting handles budgeting, permitting, contractor coordination, and on-site execution under one roof. The team works in compliance with local building codes, licensing requirements, and insurance regulations on every project. For commercial renovation services or interior renovation work, contact Djcustomcontracting for a consultation and get your project moving with a team that has seen every phase of the process.
FAQ
What is the first step in a home renovation?
The first step is defining your scope by separating required renovations from optional improvements. This list drives every budget and contractor conversation that follows.
How much contingency should I budget for a renovation?
Experts recommend 10–15% above your estimated total for partial remodels, and a higher reserve for full gut renovations where hidden conditions are more likely.
What order should renovation work follow?
The correct order is planning and permits, demolition, structural and mechanical rough-ins, insulation and drywall, finishes, and final punch list. Skipping this sequence causes rework and delays.
Do I need permits for a home renovation?
Most structural, electrical, plumbing, and HVAC work requires permits. Completing this work without permits creates title, insurance, and resale problems that are expensive to resolve later.
How do I find a reliable contractor for my renovation?
Verify licensing and insurance, check at least two references, and compare bids line by line. Written contracts and clear communication protocols are the most reliable indicators of a professional contractor.
Recommended


Comments